Imagine yourself in the 80’s. stepping into the house of your dreams. Imagine your entire life unfolding before the crisp lemon color of the walls, the white picket fence and the rough popcorn ceiling. It’s perfect, isn’t it?
More...
Back in the 80’s, popcorn ceilings, otherwise known as “Stucco ceilings” or “cottage cheese ceilings”, became a must-have in almost every home. They brightened the appearance of rooms, but they also masked imperfections.
Unfortunately, it is no longer the 80’s, and though white picket fences and lemon colored walls have become classic fixtures in modern homes, popcorn ceilings have been long out of fashion and no longer belong in modern homes.

Of course, these are not permanent fixtures, and can still be removed. We’re about to tell you how you can get rid of your outdated popcorn ceilings! It’s easy! But wait… your parents or the previous owners may have painted the ceiling prior to your acquisition of the home.
Popcorn ceilings are one thing, but painted popcorn ceilings require a slightly more taxing process to remove. Once popcorn ceilings have been painted on, it almost seals the texture.
Though it is going to be more difficult to remove painted popcorn ceilings, it is not an impossible job. If you are one of those extremely independent people who like to do things on their own, then you’re in the right place. We are going to show you how to easily remove your painted popcorn ceilings using items that you can easily acquire from the hardware store.
What You’ll Need

- Plastic
- Painter’s Tape
- Spray Adhesive
- Plastic Spray Container
- Water
- Finisher’s Knife
- Putty Knife
- Sandpaper
- Vinegar or Paint Stripper (If the vinegar is not potent enough to break down the paint, then you may substitute paint stripper in order to remove the paint from the painted popcorn ceiling)
- Face Mask (If the painted popcorn ceiling contains asbestos)
- Paper Towels
- Spackle (also known as drywall mud)
Preparing Your Work Space
Warning!
Some popcorn ceilings that were installed before the Clean Air Act of 1978 in the United States may contain asbestos. Asbestos poses serious health risks once inhaled. For your safety, have your ceilings tested for asbestos. If asbestos is present in your painted popcorn ceiling, proceed to the process only after you have worn a protective face mask.
- Clear away any furniture or items that are in your work space.
- Cover all electrical outlets in order to avoid getting plaster into the holes.
To ensure a fairly easy cleaning process after the removal of the painted popcorn walls, cover the floor of the workspace with plastic.
Using painter’s tape, tape some plastic along the edge of the walls of the room adjacent to your ceiling.

Make sure to wrap any fixtures, like lamps or fans, with plastic in order to avoid getting them dusty. Another note is to cover up your light switches so paint gunk can't damage them.
Preparing the Painted Popcorn Ceiling for Removal
- Wear your protective face mask before proceeding to the next step. Most painted popcorn ceilings contain asbestos, which has been proven to be a health hazard once inhaled.
Fill a plastic spray bottle with a mixture which contains two parts vinegar and ten parts of water.
Spray an area of the painted popcorn ceiling with the mixture. Popcorn ceilings absorb water easily, so it would be best to spray a small area first, preferably a 4 square foot area.
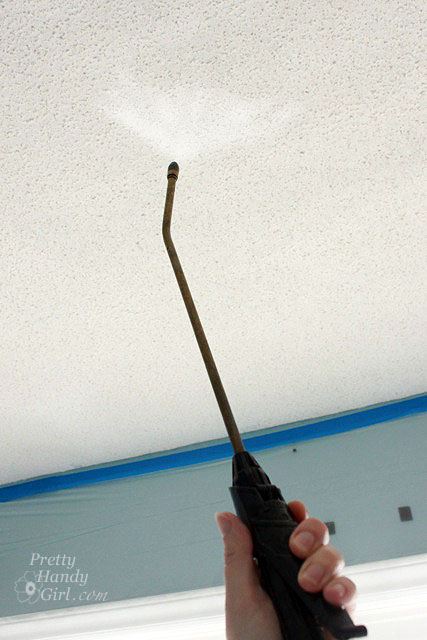
Via Pretty Handygirl
If the paint does not dissolve within a few seconds, repeat previous step using a paint stripper, instead of the water and vinegar mixture.
Once the paint comes off, spray the area again with the water and vinegar mixture. If the surface is ready to be scraped, it should turn into a texture that is similar to “oatmeal”.
Removing the Painted Popcorn Ceiling
Once the painted popcorn ceiling turns into a grayish color, scrape the surface of the ceiling using a finisher’s knife by placing the knife flat against the ceiling, and pushing outward.
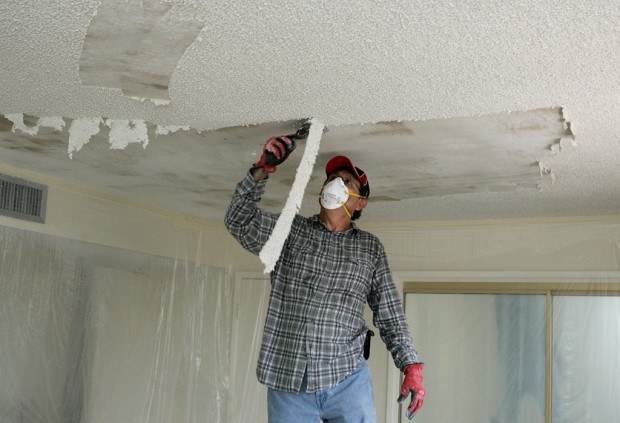
If you feel some friction that prevents you from scraping off the painted popcorn ceiling, spray the area again with the water and vinegar mixture. Keep in mind that wider knives cover a wider area as well.
For areas that are much harder to reach, use a putty knife to scrape the surface. Scrape against any moldings that are present within the room.
Use the paper towels to dry the ceiling after scraping off the surface. Make sure that no part of the ceiling has water dripping from it.
Using the sandpaper, smooth out the surface of the ceiling. Make sure to give extra attention to any areas that may have been repaired or plastered.
Post-process Instructions
Place some drywall mud on any areas in need of repair. Smooth the mud out using the finisher’s knife. If you notice any uneven patches, apply an extra layer of mud as needed.
Clean any excess that may have dropped on the floor or have stuck to the walls using water. Take extra caution when cleaning near electrical outlets. Remove any plastic that is adhered to the surfaces of the room.
For painted popcorn ceilings that were created with asbestos, make sure to seal any crumbs and dust into an airtight bag in order to avoid polluting the air and exposing others to the asbestos.
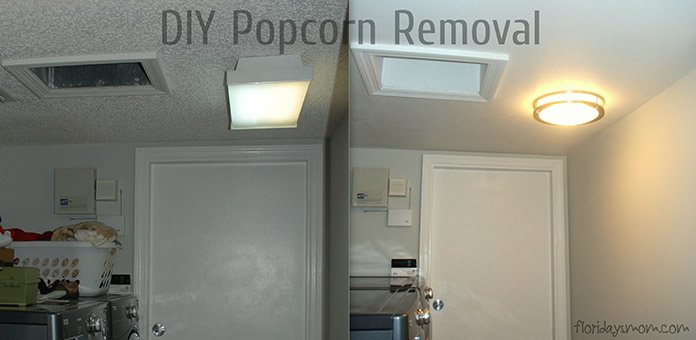
Via Floridaysmom
And that’s all there is to it! After removing your painted popcorn ceiling, you’ll be one step away from a more modern home, or maybe, you just want to stare up into your ceiling and enjoy the smooth, clean surface.
You don’t need to spend hundreds of dollars on workers in order to remove your painted popcorn ceiling. With a few household items, and easy to find materials, you can already remove those outdated painted popcorn walls that your house has been sporting since the 80’s!
VIDEO: How to Remove Popcorn Ceiling
Conclusion
After following this step-by-step tutorial, you would realize that it is not only simple to remove painted popcorn ceilings on your own, but it is also highly economical.
Have you tried removing painted popcorn ceilings on your own? Share your experiences and tips with us and your co-readers! Also, don’t forget to share this with your family and friends who may also need help in removing the painted popcorn ceilings in their homes.
Stay tuned for more how-to’s and DIY tips!

