
The words ‘3-way’ and ‘wiring’ in the same sentence may indeed intimidate any beginner handyman at first. But let me reassure you that wiring 3-way switches is, in fact, an easy and doable task. So, how to wire a 3-way switch?
More...
Essentially, you’ll be connecting a pair of 3-way light switches to a light source. A 3-way switch is used to control a light fixture from two switches, in order to easily control a light from two places. For example, in a staircase landing, a kitchen, or large den.
Wiring a 3-way switch is a basic process; a fundamental skill in electrical wiring. Basically, you are connecting the power, the two light switches, and the light itself in one circuit. It doesn’t take a lot of skill, just patience and the right attitude.
How to Wire a 3-Way Switch
The first step you will need to do is acquiring all the electrical materials you need for this project. I personally recommend buying more than enough cable, wire nuts, and extra wires to save you the trip in case you’ll find yourself lacking.
Nevertheless, make sure you tick off everything in this list before leaving the hardware store:
Materials
- 14-3 or 12-3 cable
- A pair of 3-way switches
- Wire nuts
- Electrical tape
- Screwdriver
- Scissors
- Needle-nose pliers
- Wire stripper
Step One: Cut off the power

The first thing you want to do is cut off the power from your switches and lights. This can be done by turning off the right circuit in your circuit box. You’ll be touching an open wire in the next steps, so do not proceed if you haven’t done this step.
Safety tip
To test if you turned off the right switch in the circuit box, turn your light on. If it doesn’t light up, then you turned on the correct switch.
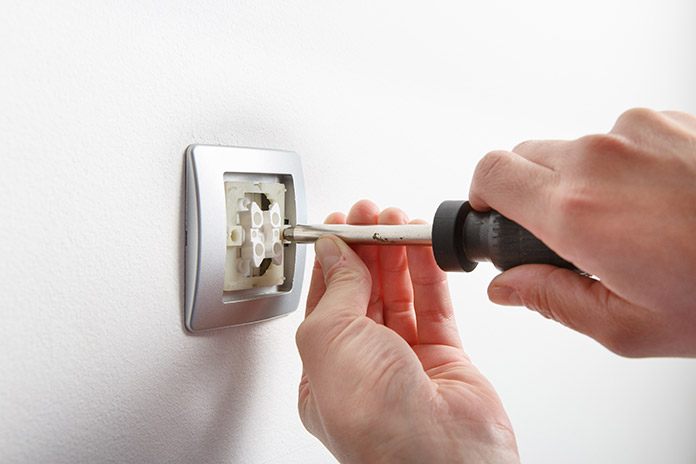
Step Two: Add a second switch box

Remember that 3-way switches need to be in pairs. Replace your existing switch with a 3-way switch in the existing box, then install the second switch box wherever you need the switch to be. Make sure that the 14-3 cable is long enough to cover the distance between these two switches.
To illustrate, I have two light switches in my living room. They’re about twenty feet away from each other, and I make sure the cable is long enough to connect. Do not cut your 14-3 cable before making sure that it will reach your switches from end to end.
Step Three: Get connecting
In a 14-3 or 12-3 cable, you’re going to count 4 wires in total. One ground wire (bare), one hot wire (black), one red wire (traveler) and one white wire (neutral). The trick is to memorize what these wires are for and what they’re called so you won’t be confused later on.
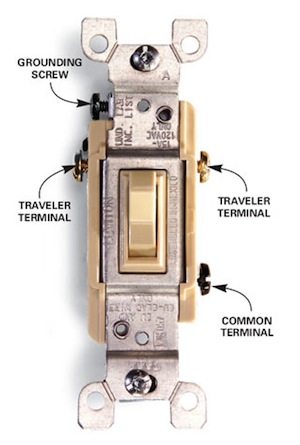
Now, look at the picture of the 3-way switch below and follow these steps:

Via Ask Me DIY
1. Screw together the ground and neutral wires
In your existing switch box, you’ll see the black, red, and white wire. When you slip your 14-3 or 12-3 cable, you’ll be seeing a mess of wires. Don’t panic! First thing you want to do is tie the two ground (bare) wires together with a wire nut. Then, do the same for the two white wires (neutral).
At this point, you will see the bare wires tied together as well as the white wires. You have your two black wires left plus one red wire.
2. Black wire -> common terminal
On your first switch where you’re going to get your power (the already existing switch), there needs to be a black wire there which is connected to your power source. What you need to do is connecting that black wire to the common terminal (as pictured below).
Via Ask Me DIY
To do this, form a loop with your pliers, hook that loop up to the screw of the common terminal, and then use the screwdriver to tighten the screw.
Pro Tip
If you’re replacing an old 3-way switch, cut off the old loops and remove a bit of the wire covering with your wire strippers. Then, form your new loops for your new switch.
3. Black wire and red wire -> traveler terminals
Screw the black wire (hot) and traveler wire (red) into the two terminal screws. It doesn’t matter which one you use for which.
Step Four: Connect the second switch
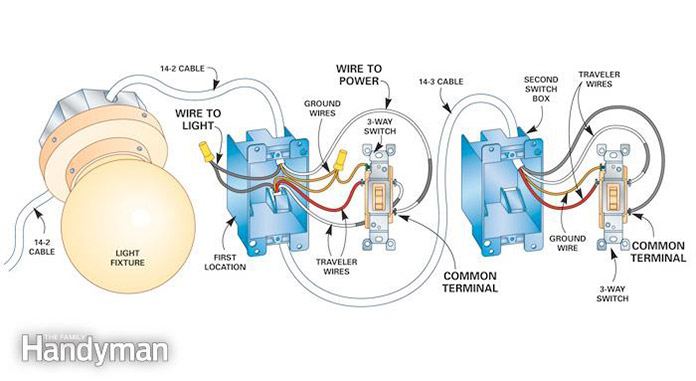
Via Family Handyman
Feed the 14-2 cable coming from your light fixture into your second switch box. Then, feed the 14-3 cable from the first switch into the second switch box also.
At this point, you will see two ground wires, two white wires, two black wires, and one red wire. It’s going to be a mess of wires, so don’t confuse yourself. Again, tie the two ground wires and two white wires together with wire nuts. Push them to the side so you can see the other wires you’ll be working with.
- Connect the black wire coming from the 14-2 switch onto the common terminal. Again, form a loop with your needle nose pliers. Hook the loop onto the common terminal screw, and then tighten the screw in place. This will connect the power to your light.
- Black and red wire -> traveler terminals. Afterwards, connect the remaining black and red wires to the two traveler terminal screws. Their position doesn’t matter.
Step Five: See the light!
Now, to see if you’ve done everything correctly, test your lights. Turn the switch in the circuit panel back on and then see if you can turn on your lights from both switches. If they don’t light up, you’ve done something wrong. Don’t get discouraged! Go back to the top and check your wiring again.
If your light can be controlled using both light switches—congratulations! You have now successfully installed a 3-way switch.
Step Six: Cover up
Now, if your light is working, which means your circuit is closed, screw in the light switches into your boxes and put on the cover.
And that’s it! You did it!
Conclusion
Now that you know how to wire a 3-way switch, it’s time to put your new skill to the test. When installing your first 3-way switch system, don’t get overwhelmed by the wires you see and follow the steps one-by-one, slowly but steadily.
Remember that if you are doing this project for the first time, take the time to read the tutorials carefully and watch videos on how to do it, before trying it for yourself. Everything should be a breeze once you’ve learned the basics.
And that’s basically all you need to know on how to wire a 3-way switch. Looking to wire a 4-way switch next time? Follow this link for a helpful instructional article.
If you found this article helpful, don’t forget to leave a comment or question below. Take the time to also share this tutorial with your friends. Thanks for reading!
thank you for help
You’re welcome